Showing posts with label Windows. Show all posts

How to install Android OS on a PC using VirtualBox

How to install Android OS on a PC using VirtualBox
How to install Android OS on a PC using VirtualBox: The success of Android OS cannot be over emphasized and anyone who has used an Android device will testify to its uniqueness and usefulness. Some people love Android devices but cannot afford to buy one, so the best alternative is installing it on their PC. Android 4.2 Jelly Bean OS offers enormous features that I can’t resist trying it out on my PC. If you are wondering why should I use Android OS on a PC? There are countless reasons why but that’s not really the scope of this article.
Android 4.1 Jelly Bean OS features great UI, better HTML5 video support, improved font positioning, Wi-Fi direct support, voice typing, and many more features that bring about better user experience. You can read more about Android 4.1 Jelly Bean here.

How to install Android OS on a PC using VirtualBox:

As much as there are so many methods of installing Android 4.2 Jelly Bean OS on a PC my best method is with VirtualBox. Android virtualization is made possible using VirtualBox. VirtualBox is a basic tool you will need in running an Android 4.2 Jelly Bean OS on a PC. Simply follow the guide here to install Android 4.2 Jelly Bean OS on your PC using VirtualBox. Now let’s get started….
Things we will need…..
  1. Download the bootable ISO file of Android OS from here.
  2. Download VirtualBox from here.
Install the just downloaded VirtualBox on your PC and on completion of installation proceed to the installation of the Android OS on the virtual machine.

Installing the Android OS on VirtualBox:

  • Launch the VirtualBox
  • Click on ‘NEW’ and click next
  • Name your OS anything you want and select Linux in Operating system
  • Select ‘Other Linux or Linux 2.6’ for the Version and click Next
  • Specify the amount of RAM you want for your Android OS (1GB is recommended) and click Next
  • Select ‘Create a virtual hard drive now’ and click ‘Create’
  • Select VDI (VirtualBox Disk Image) and click Next
  • Choose Dynamic allocated for the Storage on Physical Hard Drive and click Next
  • Choose the size of your Hard disk and click ‘Create’.
  • On the VirtualBox interface, click the OS you just created and click the ‘Settings’ button on the Menu.
  • Click on Storage and choose the virtual CD/DVD drive, Select the Disk-like Image near the CD/DVD Drive attributes
  • Select ‘Choose a virtual CD/DVD disk file’ and locate the Android ISO file you downloaded earlier and click Ok.
  • The click on the Android OS on the VirtualBox interface and click the ‘Start’ button to start the Android Virtual Machine.
  • Choose installation option to install the Android on the hard disk
  • When it gets to choose partition, select Create/Modify partitions
  • Select New >> Primary >>Bootable >>Write and Type yes when you are asked to verify command and then Quit when it’s done writing on the partition.
  • Choose the newly created partition, next choose ext3 format to format the partition and select yes to confirm.
  • Then the partition will be formatted quickly.
  • Then choose ‘Yes’ to confirm the installation of boot loader GRUB and ‘No’ on the next question.
Then the Android OS will be installed, you can then run it now.
Reboot the virtual machine and un-mount the Android generic ISO so the machine will not boot through the mounted disk again.
Follow the steps in this tutorial carefully and you will be able to learn how to install Android OS on a PC using VirtualBox. Now i hope you can install Android OS on your PC using VirtualBox, if you have any questions or contributions to this tutorial, please use the comment form below, i will be very glad to assist you in any way i can. Remember to subscribe to my RSS feed.


Download Free PDF Creator for Windows PC

Download Free PDF Creator for Windows PC:

Using a virtual printer to convert documents into PDFs format is an easy way to avoid printing papers.  The main reasons for doing so are convenience, as you can send documents and information straight from any Windows program supporting print to the virtual printer to convert it and functionality as good solutions offer lots of customization options.
Free PDF Creator is a free virtual printer solution for Windows that comes without time limits or other restrictions such as the number of uses.
Note : Print Spooler service needs to have been started on the system before you install the PDF converter as the creation of the virtual printer will fail otherwise. You can skip registration during setup as well as it is not mandatory to use the software.

Download Free PDF Creator for Windows PC
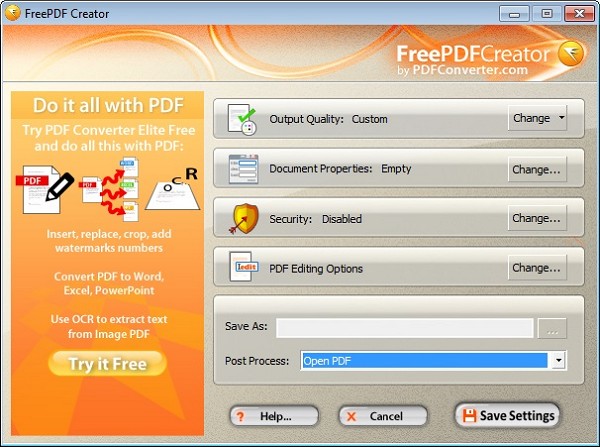
After you have installed the program, run the settings from the start menu. Here you can define the following output parameters:
  • Output quality – Set to web ready by default which you can change to print, pre-press or custom quality here.
  • Document properties – Document meta data such as the author, subject, keywords or titles which are used for all pdf documents created with the help of the program.
  • Security – Here you can set a password to open the document and define document changing rights for users including printing and making changes to it.
  • Post processing – If you want the pdf to be post-processed.
The program displays ads in the settings menu and also under PDF Editing Options which lead to web pages of commercial programs that allow you to edit PDF documents.
Download Free PDF Creator for Windows PC

Get iPad Interface on your Windows PC using iPadian

Get iPad Interface on your Windows PC using iPadian:

iPadian brings the feel and look of an iPad on Windows PC. The best thing is you don’t have to install iPadian, as it’s portable. Just run the iPadian exe file, and in the blink of an eye you will see an iPad interface on your Windows desktop.

Also seeHow to Turn Your Windows PC Interface Into Mac

Features of iPadian – iPad Simulator

It features standalone Adobe air application, Full Screen preview, Custom App Store, Games, Free music & videos, Webkit browser, Support Facebook notification & messages and Social Chat.
 

The above screenshot shows the dashboard where you can access all in-build applications by clicking on the icons.
 

The above screenshot shows the Email, Messenger and Facebook – all on same screen. This stimulator also comes with a Webkit browser so that you don’t have to minimize iPadian every time you want to browse the web. You can use this Webkit browser and browse the web, just like through iPad.
Go ahead and download iPadian for free.

.
Get iPad Interface on your Windows PC using iPadian


Also see: How to Turn Your Windows PC Interface Into Windows 8

Windows 8 UX Pack 6.0 (Windows7 Only)

Windows 8 UX Pack 6.0: (Windows 7 Only)

Windows 8 UX Pack 6.0

Windows 8 UX Pack 6.0 will theme your Windows 7 desktop with Windows 8 User Experience. Including Windows 8 Login Screen, Themes, Wallpapers, Metro/Modern UI, Aero’s Auto-Colorization, Taskbar UserTile and more.

What’s new in 8UXP v6.0
  • Added Charms Bar as Immersive UI’s alternative
  • Added Windows 8 RTM wallpapers
  • Configured launcher’s application startup delay to 5 seconds
  • Configured Metro Desktop UI and Aero’s auto-colorization to be used by default if applicable
  • Fixed launcher asking for adminstrative rights everytime on startup
  • Fixed changing logon screen requires restart on OEM bunbled machine
  • Updated Newgen’s start screen background to Windows 8 RTM’s default
  • Updated Starb orb rebuilt for better look and usability
  • Updated Theme selection list to Glass UI/Metro UI/Modern UI
  • Updated Windows 8 theme for Windows 7 by wango911 with customized theme files


Download Windows 8 UX Pack (8UXP) v6.0
Note: Please remove the extra _ in the downloaded file name (if any).
File Name: 8UXP6.zip | File Size: 19.4 MB | Proper Release: 06-Sep-2012
MD5 for the packed installer: 958CADD33AF830836B01CD4914F3EE42
Can’t install/use 8UXP? Check out our Help page. Screenshot & Changelog↑

Windows 8 Transformation Pack 6.0 (Windows 7/Vista/XP)

Windows 8 Transformation Pack 6.0: (Windows 7/Vista/XP)


Windows 8 Transformation Pack 6.0
Windows 8 Transformation Pack 6.0 will transform your Windows 7/Vista/XP user interface to Windows 8. Including Windows 8 Boot Screen, Login Screen, Themes, Wallpapers, Icons, Sounds, Fonts, Metro/Modern UI, Aero’s Auto-Colorization, Taskbar UserTile and more.
What’s new in 8TP v6.0
  • Added Windows 8 RTM wallpapers
  • Configured Aero frame UI, Metro Desktop UI and Aero’s auto-colorization to be used by default if applicable
  • Improved Segoe fonts family installation code for better compatibilities
  • Updated Metro Inspirat theme with improved start orb and few adjustments
  • Updated Newgen’s start screen background to Windows 8 RTM’s default
  • Updated Segoe fonts family from Windows 8 RTM
  • Updated TrueTransparency Aero skin rebuilt from Windows 8 RTM resources
  • Updated Windows 8′s Explorer toolbar layout configuration
  • Updated Windows 8 theme for Windows 7 by wango911 with customized theme files
  • Updated system files resources found in Windows 8 RTM
    • Boot Screen (Windows XP)
    • Logon screen background
    • Navigation buttons
    • Network tray icons
    • System Tray icons
    • Shell icons
    • Shell pane background
    • Shutdown/Logoff/Theme dialogs (Windows XP)
    • Start button/orb


Download Windows 8 Transformation Pack (8TP) v6.0
Note: Please remove the extra _ in the downloaded file name (if any).
File Name: 8TP6.zip | File Size: 47.4 MB | Release Date: 05-Sep-2012
MD5 for the packed installer: EDA006853A5F29E5DABD3C616150C00E
Can’t install/use 8TP? Check out our Help page. Screenshot & Changelog↑

Download DirectX 11 For Windows 7

Update! Download DirectX 11 For Windows 7:

Download DirectX 11 For Windows 7
DirectX 11, the next generation of Windows DirectX graphic technology will be implement on Windows 7 with support wide varieties of Windows games and graphic display devices. After making DirectX 10 available for windows Vista, Microsoft has released DirectX 11 with Direct3D 11 available for download as technical preview for public testing.
“This version of the Windows 7/Direct3D 11 Technical Preview ships as part of the DirectX SDK and contains the following new features, tools, and documentation: Technical Preview of Direct2D; Technical Preview of DirectWrite; Technical Preview of DXGI 1.1,” the Redmond company informed.
As Windows 7/Direct3D 11 Technical Preview is part of DirectX SDK and contains Technical Preview of Direct2D, DirectWrite, DXGI 1.1. Good news is, it is not only available as Technical Preview but also as DirectX End-User Runtimes.

This DirectX11 release contains the following new Direct features and tools:

  • Technical Preview of Direct2D
Direct2D is a hardware-accelerated, immediate-mode, 2-D graphics API that provides high performance and high quality rendering for 2-D geometry, bitmaps, and text. The Direct2D API is designed to interoperate well with Direct3D and GDI. This technical preview allows developers to evaluate the API and write simple applications, with some of the more advanced functionality possible on properly configured machines.
  • Technical Preview of DirectWrite
DirectWrite provides support for high-quality text rendering, resolution-independent outline fonts, and full Unicode text and layout support, and much, much more.
  • Technical Preview of DXGI 1.1
DXGI 1.1 builds on DXGI 1.0 and will be available on both Windows Vista and Windows 7. DXGI 1.1 adds several new features.
However, Direct3D 11 (DirectX 11) that supported on Windows 7 and Windows Vista only. Except Windows XP users cannot install DirectX 11.


Screenshots
Download DirectX 11 For Windows 7

Repair Your Windows XP Without Bootable CD

Repair Your Windows XP Without Bootable CD

Many Times the registry entries or files of our system got corrupted because of viruses or other reasons in this case for repairing windows XP we format our system or repair windows xp by some other ways like by using Bootable Cd Method. But by this method we can repair our Windows xp without using Bootable CD or Formatting  System.

This Method is called Web Folders XP Repairing System.
For Applying This Method Just Follow Below given Simple steps:
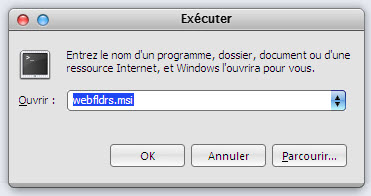
Step 1 – First Click on Start and go to Run.
Step 2 – In Run Type webfldrs.msi .

Repair Your Windows XP Without Bootable CD 
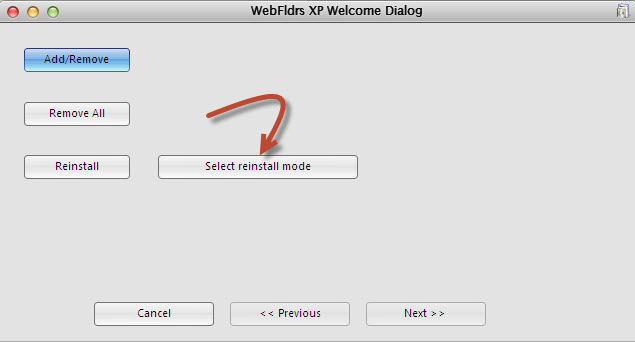
Step 3 – New window will open in your screen now Click on Select Reinstall Mode.
Repair Your Windows XP Without Bootable CD

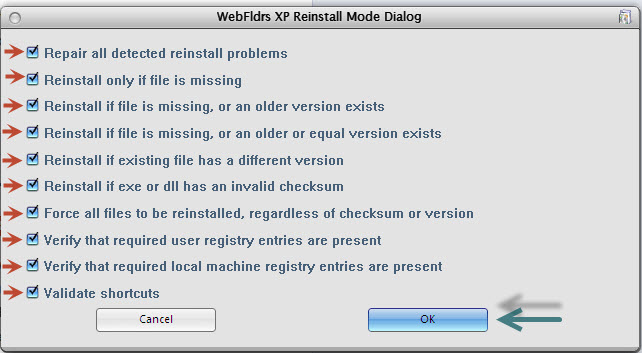
Step 4 – Again New Window will open in your screen just check marks on all the options and Click on OK .


Repair Your Windows XP Without Bootable CD 
Step 5 – It will take some time in Repairing your windows XP and when the process will be completed it will ask to Restart your System then just restart your system.
Thats It ! By Using this simple Method Your Windows XP will be repaired without using bootable CD or Formatting